How to log history and logins from multiple ssh-keys under one user account

Many times your managed server has only one user account into wich every admin logs in with his personal ssh-key. Most times it’s done with the root account, but that’s a nother topic 😉 As a result of this behaviour your are not able to see who logged in and what he or she did. A often suggested solution would be using different user account per person with only one ssh-key for authorization. This adds the „overhead“ of memorizing (except when you use ~/.ssh/config) and managing the sudoers file for all the accounts.

A more clever way is to use the SSH Environment feature in your authorized_keys file. First you need to enable this feature within the /etc/sshd/sshd_config file:

PermitUserEnvironment yes

After that you can configure your ~/.ssh/authorized_keys file:

environment="SSH_USER=USER1" ssh-rsa AAAAfgds...
environment="SSH_USER=USER2" ssh-rsa AAAAukde..

This sets the SSH_USER variable on Login in reference to the used ssh-key. NOw that this variable is updated on every login you can go on and work with it. First of to the logging of the actuall key that logs in. Under normal circumstances the ssh-dameon logs only the following information

sshd[21169]: Accepted publickey for user_account from 127.0.0.1 port 46416 ssh2

Additinally you could pass the SSH_USER content on to the syslog-dameon to log the actual user:

if [ "$SSH_USER" != "" ]; then
  logger -ip auth.notice -t sshd "Accepted publickey for $SSH_USER"
fi

This writes the following into the /var/log/auth (Debian) or /var/log/messages (RedHat) file:

sshd[21205]: Accepted publickey for USER1

Further more you can change the bash history file to a personal user file:

  export HISTFILE="$HOME/.history_$SSH_USER"


All together it looks like this:

if [ "$SSH_USER" != "" ]; then
  logger -ip auth.notice -t sshd "Accepted publickey for $SSH_USER"
  export HISTFILE="$HOME/.history_$SSH_USER"
fi


Puppet
To use the environment option within your ssh-key management in puppet you need the options field from the ssh_authorized_key function:

ssh_authorized_key { "${username}":
 
  key     =>  "AAAAsdnvslibyLSBSDFbSIewe2131sadasd...",
  type    =>  "ssh-rsa,
  name    =>  "${username}",
  options =>  ["environment=\"SSH_USER=${username}\""],
  user    =>  $user,
  ensure  =>  "present",
}


Hope this helps, have fun! :)

p.s.: This is a guest post by Martin Mörner, a colleague from Aperto.

my package of the day – htmldoc – for converting html to pdf on the fly

PDF creation got actually fairly easy. OpenOffice.org, the Cups printing system, KDE provide methods for easily printing nearly everything to a PDF file right away. A feature that even outperforms most Windows setups today. But there are still PDF related task that are not that simple. One I often run into is automated PDF creation on a web server. Let’s say you write a web application and want to create PDF invoices on the fly.

There are, of course, PDF frameworks available. Let’s take PHP as an example: If you want to create a PDF from a php script, you can choose between FPDF, Dompdf, the sophisticated Zend Framework and more (and commercial solutions). But to be honest, they are all either complicated (as you often have to use a specific syntax) to use or just quite limited in their possibilities to create a pdf file (as you can only use few design features). As I needed a simple solution for creating a 50+ pages pdf file with a huge table on the fly I tested most frameworks and failed with most of them (often just as I did not have enough time to write dozens of line of code).

So I hoped to find a solution that allowed me just to convert a simple HTML file to a PDF file on the fly providing better compatibility than Dompdf for instance. The solution was … uncommon. It was no PHP class but a neat command line tool called „htmldoc“ available as a package. If you want to give it a try just install it by calling „aptitude install htmldoc“.

You can test htmldoc by saving some html files to disk and call „htmldoc –webpage filename.html“. There a lot of interesting features like setting font size, font type, the footer, color and greyscale mode and so on. But let’s use htmldoc from PHP right away. The following very simple script uses the PHP output buffer for minimizing the need for a write to disk to one file only (if somebody knows a way of using this without any temporary files from a script, let me know):

// start output buffer for pdf capture
 
ob_start();
?>
your normal html output will be places here either by
dumping html directly or by using normal php code
<?php
// save output buffer
$html=ob_get_contents();
// delete Output-Buffer
ob_end_clean();
// write the html to a file
$filename = './tmp.html';
if (!$handle = fopen($filename, 'w')) {
	print "Could not open $filename";
	exit;
}
if (!fwrite($handle, $html)) {
	print "Could not write $filename";
	exit;
}
fclose($handle);
// htmldoc call
$passthru = 'htmldoc --quiet --gray --textfont helvetica \
--bodyfont helvetica --logoimage banner.png --headfootsize 10 \
--footer D/l --fontsize 9 --size 297x210mm -t pdf14 \
--webpage '.$filename;
 
// write output of htmldoc to clean output buffer
ob_start();
passthru($passthru);
$pdf=ob_get_contents();
ob_end_clean();
 
// deliver pdf file as download
header("Content-type: application/pdf");
header("Content-Disposition: attachment; filename=test.pdf");
header('Content-length: ' . strlen($pdf));
echo $pdf;

As you can see, this is neither rocket science nor magic. Just a wrapper for htmldoc enabling you to forget about the pdf when writing the actual content of the html file. You’ll have to check how htmldoc handles your html code. You should make it as simple as possible, forget about advanced css or nested tables. But it’s actually enough for a really neat pdf file and it’s fast: The creating of 50+ page pdf files is fast enough in my case to make the on demand access of htmldoc feel like static file usage.

Please note: Calling external programs and command line tools from a web script is always a security issue and you should carefully check input and updates for the program you are using. The code provided should be easily ported to another web language/framework like Perl and Rails.

my package of the day – gpg for symmetric encryption

Though asymmetric encryption is state of the art today, there are still cases when you probably are in need of a simple symmetric encryption. In my case, I need an easy scriptable interface for encrypting files for backup as transparent as possible. While you can, of course, use asymmetric encryption for this, symmetric methods can save you a lot of time while still being secure enough.

So there are methods like stupid .zip encryption or a bunch of packages in the repositories like „bcrypt“ that provide you with their implementations. But there is a tool, you already know and maybe even use, but don’t think of when considering symmetric encryption: „gpg„. Actually gpg heavily relies on symmetric algorithms as you might know. The public/private key encryption is a combination of asymmetric and symmetric encryption as the latter is quite more cpu efficient. In our case, gpg will use the strong cast5 cipher by default.

Encrypting

So as gpg already knows about a bunch of symmetric encryption algorithms, why not use them? Let’s just see an example. You have a file named „secretfile1.txt“ and want to encrypt it:

$ gpg --symmetric secretfile1.txt

You will be prompted for a password. Afterwards you’ll have a file named secretfile1.txt.gpg. You are already done! Please note: The file size of the encrypted file might have decreased as gpg also compresses during encryption and outputs a binary. In my test case the file size went down from 700k to 100k. Nice.

Armoring

In case you need to have an easy portable file that is even ready to be copy-pasted, you can ask gpg to create an ascii armor container:

$ gpg --armor --symmetric secretfile1.txt

The output file will be called „secretfile1.txt.asc“. Don’t bother to open it in a text editor of your choice. The beginning will look similar to this:

$ head secretfile1.txt.asc
-----BEGIN PGP MESSAGE-----
Version: GnuPG v1.4.6 (GNU/Linux)

jA0EAwMChpQrAA/o8IFgye1j3ErZPvXumcnIwbzSvENDD/fYlWMRiY/qqvn949kV
+mo/v+nQi7OFrrA45scQPuPbj8I1T+2f7XAT4ouW2kuHIJ/2zkyrxBMvO04fDH82
273NwUrXd/s+JJXe+wJz149K324rE7+FIHvfImiez8lRs5qyRI/drp/wFK8ZHRvF
gzhDGaTe8Dgj1YqHgWAY4eAjrXhYLI1imbIYrV1OVPia6Roif37FV7C1AT/i/2HX
2ytI2mBhQLdqkSVeqXZ74lgZhsitnOeqZH65IuTLi77PUcroFOuefw6+4qSpMIuM
8dyi4jCqQ1jCR7PRorpGvm3RtXhlkB689vrknKmOa5uztTj3MGrPOgC6jegBpu/L
3419sAxRtw8bj2lP76B+XXPZ2Tuzpg01hC/BWlifSexy+juYXv7iuF5BuQ1z7nTi

(In this case I used ‚head“ for displaying the first ten lines. Head is similar to tail, which you might already know.) Though the ascii file is larger than the binary .gpg file it is still much smaller than the original text file (about 200k in the above case). When tampering with binary files like already compressed tarballs the file size of the encrypted file might slightly increase. In my test, the size grew from a 478kB file to a 479kB file when using binary mode. In ascii armor mode the size nearly hit the 650kb mark, which is still pretty acceptable.

Decrypting

Decrypting is as easy. Just call „gpg –decrypt“, for instance:

$ gpg --decrypt secretfile1.txt.gpg
# or
$ gpg --decrypt secretfile1.txt.asc

gpg knows by itself, if it is given an ascii armored or binary file. But nevertheless the output will be written to standard output, so the following line might be much more helpful for you:

$ gpg --output secretfile1.txt --decrypt secretfile1.txt.gpg

Please note, that you need to stick to the order first –output, then –decrypt. Of course you can also use a redirector („>“).

Piping

So, for the sake of it: The real interesting thing is that you can use gpg symmetric encryption in a chain of programs, controlled by pipes. This enables you to encrypt/decrypt on the fly with shell scripts helping you to write strong backup scripts. Gpg already detects, if your are using it in a pipe. So let’s try it out:

$ tar c directory | gpg --symmetric --passphrase secretmantra \
| ssh hostname "cat &gt; backup.tar.gpg"

We just made a tarbal, encrypted it and sent it over ssh without creating temporary files. Nice, isn’t it? To be honest, piping over ssh is not a big deal anymore. But piping to ftp? Check this:

$  tar c directory | gpg --symmetric --passphrase SECRETMANTRA \
| curl --netrc-optional --silent --show-error --upload-file - \
--ftp-create-dirs ftp://USER:PASSWORD@SECRETHOST/SECRETFILE.tar.gpg

With the mighty curl we just piped from tar over gpg directly to a file on a ftp server without any temporary files. You might get a clue of the power of this chain. Now you can start using a dumb ftp server as encrypted backup device now completely transparently.

That’s all for now. If you like encryption, you should also check symmetric encryption and the possibilities of enhancing daily business scripts security by adding some strong crypto to it. Of course you can complain about the security of the password, the possible visibility via „ps aux“, but you should be able to reduce risks by putting some brain in it. In the meantime check „bashup„, the bash backup script, which uses methods described here to provide you with a powerful and scriptable backup library written in Bash with minimum depencies. And yes, gpg will be added soon.

my package of the day – sash – the Stand Alone SHell for system recovery

Let me introduce you today to a package that is quite unknown as you hopefully never need it. But when you need it and have not thought about it before, it is probably already too late. I am talking about „sash“ – the „Stand Alone SHell“. Yet another shell? Yes and no. Yes it is a shell, but no, I am not trying to show something like the shiny friendly interactive shell or (my favorite) „zsh“. Quite the contrary: You can give „sash“ a lot of attributes, but not „shiny“.

So what is about? Imagine the following case: You are running a machine and suddenly something goes totally wrong. Partition errors, missing libraries, you have messed around with libc, whatever. This can get you into serious trouble. You are fine, when you have the possibility to boot a recovery cd or something similar. But under some circumstances you might have to stick to the programs already installed though they seem to be broken. Maybe it is a virtual server somewhere on the web and you are only allowed to boot into a recovery mode giving you a prompt to your server. So you are trying to login as root but it just does not work for some reasons. Broken dependencies. Who knows.

The point is: When you login onto a machine for system recovery, you are already relying on a lot of tools and dependencies – though it only seems to be a shell. The shell might be linked against a couple of libraries, a lot of commands you want to run are not build in and therefore a bunch of external dependencies can bar your way. So what you actually might need in a situation of severe pain is a shell that provides you with as much essential tools as you need on its own without relying on external code.

Installing sash

This is where „sash“ comes into play. Sash is not a dynamic linked executable, it has actually all needed features built in. So as long as you can execute the sash binary, you can have a working shell. Let’s check it! Install „sash“ by using „aptitude install sash“ or you preferred package manager. Please note, that sash will clone your current root account:

cloning root account entry to create sashroot account in /etc/passwd
Cloned sashroot from root in /etc/passwd
cloning root account entry to create sashroot account in /etc/shadow
Cloned sashroot from root in /etc/shadow

So you have this new line in your /etc/passwd:

sashroot:x:0:0:root:/root:/bin/sash

You should consider giving sashroot a password if you want to be able to login with this account. But please check if this applies to your security needs.

See the difference

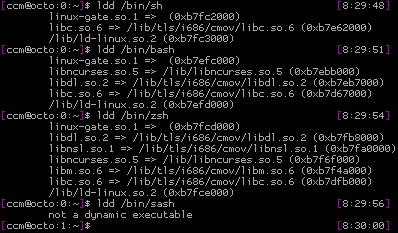
Now let’s check how the sash binary differs from the standard shell, the bash and the zsh. We are using „ldd“ for this, as it is lists libraries, an executable is linked against:

bildschirmfoto-terminal.png

Pretty impressive. All „normal“ shells have at least three dependencies, sash apparently has none.

But getting rid of external libraries is not the only difference sash makes. Another major feature is the collection of built-in commands:

-ar, -chattr, -chgrp, -chmod, -chown, -cmp, -cp,
-dd, -echo, -ed, -grep, -file, -find, -gunzip,
-gzip, -kill, -ln, -ls, -lsattr, -mkdir, -mknod,
-more, -mount, -mv, -printenv, -pwd, -rm, -rmdir,
-sum, -sync, -tar, -touch, -umount, -where

Seems like a list of commands you yearn for, when in recovery mode, don’t you? Note the leading „-“ at the beginning of those commands. This is the way, sash handles your attempts to run internal and external commands. When using „mv“, sash gives you the normal /bin/mv, when using „-mv“, sash provides you with it’s own replacement. But „sash“ helps you when you don’t want to type the „-“ at the beginning of every command. You can enter „aliasall“ in a sash session as it will create non permanent aliases for all builtin commands:

bildschirmfoto-terminal-1.png

Emergency

In case of an emergency you might need to boot directly into sash as maybe your initrd stuff is broken. How? Just append a „init=/bin/sash“ to your kernel command line – be it lilo or grub. This way, you will be directly dropped into a sash session.

What’s missing?

Sadfully one essential command is missing: fsck. As the sash manual points out: fsck is just way too big to be included in a statically linked binary. Sad, but true. But hey: Better being to able at least to act on the console than having no console at all.

Sash as a standard shell?

… is not a good idea. It just lacks a lot of features you’ll really want when working on the command line: A verbose prompt, command history, tab completion and so on.

So it’s to install sash now as you will miss it, when it’s too late :)
(And just if you’d like to ask: Yes, at least once I really needed sash and it helped me to save a lot of time.)

removing outdated ssh fingerprints from known_hosts with sed or … ssh-keygen

At least from the last issue in Debian-based systems including Ubuntu you might know the pain of getting the message from you ssh client that the server host key has changed as ssh stores the fingerprint of ssh daemons it connects to. Actually this is a neat feature because it helps you detecting man in the middle attacks, dns issues and other things you probably should notice.

Until recently I opened the file .ssh/known_hosts in vim, deleted the entry, saved the file and started over again. I randomly checked „man ssh“ which gives you a lot of hints about the usage of known_hosts but I just did not find information about how to delete an old fingerprint or even overwrite it. I imagined something like „ssh –update-fingerpring hostname“ with an interactive yes/no question you cannot skip. There is the setting „StrictHostKeyChecking“ that might get you out of the fingerprint-has-changed-trouble but it does not solve the real problem as you want those checks.

So after hanging around with Mnemonikk discussing this he pointed out a very simple method with „sed“ that is really handy and helps you understanding sed more deeply. You can advise „sed“ to run a command on a specific line. So have a look at this session:

1
2
3
4
5
6
7
8
9
10
11
12
13
14
$ ssh secrethost
@@@@@@@@@@@@@@@@@@@@@@@@@@@@@@@@@@@@@@@@@@@@@@@@@@@@@@@@@@@
@    WARNING: REMOTE HOST IDENTIFICATION HAS CHANGED!     @
@@@@@@@@@@@@@@@@@@@@@@@@@@@@@@@@@@@@@@@@@@@@@@@@@@@@@@@@@@@
IT IS POSSIBLE THAT SOMEONE IS DOING SOMETHING NASTY!
[...]
Offending key in /home/ccm/.ssh/known_hosts:46
[...]
Host key verification failed.
$ sed -i "46 d" .ssh/known_hosts
$ ssh secrethost
The authenticity of host 'secrethost (1.2.3.4)' can't be established.
RSA key fingerprint is ab:cd:ef:ab:cd:ef:ab:cd:ef:ab:cd:ef:ab:cd:ef:ab.
Are you sure you want to continue connecting (yes/no)?

We just took the line number 46 which ssh complains about and run in in-place-editing mode (-i) with the command run on line 46 the command delete (d). That was easy, wasn’t it? Small lesson learned about sed. Thank you Mnemonikk (he is currently working on a screencast about screen if you let me leak some information here :).

But to be honest I’s still looking for the „official“ method the delete a key from known_hosts. Therefore I browsed through the man pages and finally found what I was looking for in „man ssh-keygen“. Yes, definitely zero points for usability as deleting with a tool named „generator“ is confusing but it works, however. You can advice ssh-keygen to delete (-R) fingerprints for a hostname which helps you when you turned hashed hostnames on in you known_hosts:

1
2
3
4
5
6
7
8
9
10
11
12
13
14
15
$ ssh secrethost
@@@@@@@@@@@@@@@@@@@@@@@@@@@@@@@@@@@@@@@@@@@@@@@@@@@@@@@@@@@
@    WARNING: REMOTE HOST IDENTIFICATION HAS CHANGED!     @
@@@@@@@@@@@@@@@@@@@@@@@@@@@@@@@@@@@@@@@@@@@@@@@@@@@@@@@@@@@
[...]
Offending key in /home/ccm/.ssh/known_hosts:63
[...]
Host key verification failed.
[ccm@hasung:255:/etc/ssh]$ ssh-keygen -R secrethost
/home/ccm/.ssh/known_hosts updated.
Original contents retained as /home/ccm/.ssh/known_hosts.old
[ccm@hasung:0:/etc/ssh]$ ssh secrethost
The authenticity of host 'secrethost (1.2.3.4)' can't be established.
RSA key fingerprint is ab:cd:ef:ab:cd:ef:ab:cd:ef:ab:cd:ef:ab:cd:ef:ab.
Are you sure you want to continue connecting (yes/no)?

So „ssh-keygen -R hostname“ is a nice syntax as you even do not have to provide the file name and path for known_hosts and it works with hashed names. Nevertheless I’ll also use the sed syntax – keep it trained it’ll help you in other cases also.

Joining an Active Directory domain with Ubuntu

What a pain. Imagine you are in Windows network environment and have a small amount of Ubuntu desktops. You task is to let them join the Active Directory so users can login with their known credentials. There is a package in universe called „authtool“ even providing and promising to do what you need. Sadfully it is quite broken in it’s current status and if you ask me one should even consider removing it until it does at least not break you boot (don’t ask for details) and has a good set of working dependencies. There are other methods as ldap-binding but in my eyes there are either not stable or just too complicated to configure (and therefore hardly qualified for convincing people).

But a solution approaches if you read the following Ubuntu blueprint „Single User Interface to Join and Participate in Microsoft Active Directory Domains„. Currently you might not find much more information about it. So I dropped a line to the blueprint creator Gerald ‚Jerry‘ Carter who was so kind of updating me with the current status of the project (and happens to be directly involved in Likewise):

It is planned to package the open source version of Likewise called „Likewise Open“ for Ubuntu Hardy. Likewise Open enables you to join an Active Directory with actually some simple clicks or one console command. There is already an updated source tarball which can be installed quite easily:

1
2
3
4
5
$ wget \http://archives.likewisesoftware.com/\
likewise-open/src/likewise-open-4.0.4.tar.gz
$ tar zxf likewise-open-4.0.4.tar.gz
$ cd likewise-open-4.0.4-release
$ make dpkg

If you have all necessary dependencies resolved the make process should provide you with .deb files which you should install. As Jerry states there is currently one blocker which can be worked by not using the gui but calling a line like this

1
$ sudo domainjoin-cli join AD_REALM ADMIN_ACCOUNT

Afterwards you should be able to login like this „realm\username“. I tried the process on Gutsy and it worked quite well. I had to reboot once as my gdm hang – maybe it’s better to call the command directly from a „real“ console. So what is missing? Check the comparison of Likewise Open and Likewise Enterprise, the commercial version of Likewise. The thing you might miss at first is:

Do more during logon: Create a home directory, copy template files, set permissions, run scripts, deliver messages, and more.

This means that Likewise Open enables you to login as AD user, creates his home under /local/AD_REALM/USER but you have be smart and hack around a bit to get things working like managing sudo, running scripts and so on. But nonetheless Likewise Open seems to be a promising approach for solving the problem of Ubuntu-Windows-network integration and I am sure to see some nice addons from the community in the future.

Please note: Installing software that changes login procedures is a deep intervention into Linux core procedures. So please: Do this with a test environment before considering it for production purposes.

/usr/bin/test not /usr/bin/[ anymore?

I am really puzzled: While proudly presenting some linux knowledge I could not explain why /usr/bin/test and /usr/bin/[ are on Debian and Ubuntu (and maybe other distributions) not binary and symlink but different binaries. On Ubuntu Gutsy it looks like this:

[ccm:0:~]$ ls -l /usr/bin/test
-rwxr-xr-x 1 root root 23036 2007-09-29 14:51 /usr/bin/test
[ccm:0:~]$ ls -l /usr/bin/\[
-rwxr-xr-x 1 root root 25024 2007-09-29 14:51 /usr/bin/[
[ccm:0:~]$ md5sum /usr/bin/test
d83583f233cb4a014c2e9faef6bb9b32  /usr/bin/test
[ccm:0:~]$ md5sum /usr/bin/\[
b1e9282a48978a17fb7479faf7b8c8b7  /usr/bin/[

When playing around with them, they even behave different:

[ccm:0:~]$ /usr/bin/test --version
[ccm:0:~]$ /usr/bin/\[ --version
[ (GNU coreutils) 5.97

On Debian, Fedora, RedHat it looks the same. It puzzles me as just some weeks ago I read one of them is actually a symlink and think I the first test I made showed me machine where it behaved that way.

So maybe someone can update me why these binaries are different now. Guess there cannot be good reason as „man test“ and „man [“ show the same document:

ls -l /usr/share/man/man1/\[.1.gz
lrwxrwxrwx 1 root root 9 2007-12-04 19:20 /usr/share/man/man1/[.1.gz -> test.1.gz

And when answering this: „/usr/bin/test“ is part of coreutils, but /usr/bin/[ ?

Powered by ScribeFire.

The dilemma of ssh authorized_keys key files and its comments

Imagine the following situation: You care for live servers and work in a team of let’s say five, six or even more people. Access to the servers is granted through ssh. The people login either as root (yes, you should not do that, but that is not the point here) or as user with sudo rights or they just share an unprivileged account. Authentication is done via ssh keys.

Now somebody leaves your team. Either as he has a new job or he just got fired. Of course you start deleting his key from all those ~./ssh/authorized_keys files. You have been smart before as you forced your buddies to use their real name or mail address as comment in the key. Easy identification.

But then you start thinking: How do I know I am deleting the right keys? Let’s say the target user is a smart bad guy. He just might have done the following: He looks for somebody who seldomly logs in. Maybe a manager has a key just for security purposes or something like that. Now he exchanges the order of the keys and its comments if they are in a shared authorized_keys or he even exchanges the authorized_keys files when they belong to different users, so you just think you are deleting the right keys but disable another person – in the worst case even yourself.

Of course you can start working around this with trip wire, shell scripts and so on, but be honest: Being able to change the comment in an ssh key without disturbing a checksum or even a signature that rings bells and whistles is a pain for every security minded administrator.

Feel free to hint me an easy solution for this that you might already have implemented.