usability as blocker? of course. – UbuntuOne and the bandwith limit

Recently I ran into a missing feature of the UbuntuOne client. If you don’t know yet: UbuntuOne is the Canonical driven online space for storing and saving data. It’s a commercial service with a free entry level like similar offers from DropBox. The UbuntuOne client is a small open source application that cares for the synchronisation of files. So when you put a file in a specific folder, the client pushes it to the server or pulls changes in the same way.

The missing feature was a small one: The ability to limit the upload speed. As you might know, uploading large files can nearly block you internet access as your machine isn’t able to send back packages in time. So limiting upload speed either automatically or with a specific setting helps you sending data to the net while still being able doing other things.

While the fact that the feature is somehow is maybe rather not of interest for you, the interesting part is to see how the feature request evolves in the Ubuntu bug tracker. I filed a request myself (#375328) and ran into a – technically correct – discussion about the necessity of implementing network speed limits inside applications. Of course you have the ability to use the Linux kernels traffic shaping features or even a more centralized setup in your local network. While these arguments are absolutely right from an administrator’s point of view they are nearly incorrect from an end user’s side. And end user shouldn’t really care about lan traffic shaping setups or need to know about the Linux kernel’s traffic shaping features.

So while more beta testers filed similar feature requests and (#381348) got the main ticket, the importance of this issue remained in the discussion. I’s surprised to see that the request got recently tagged as „karmic-blocker“ meaning it has to be done before Ubuntu Karmic Koala is released. While the tag was removed temporarily as a reason was missing, Elliot Murphy filed it later, stating

„if we don’t have bandwidth limiting and the user fires up their laptop on a slow connection (maybe an edge connection via their mobile phone), and the syncdaemon will use all available bandwidth and cripple any other applications that need some bandwidth. we’ve gotten bug reports from users already complaining about this being so bad that DNS requests are taking forever to get through. so, I think the syncdaemon having some semi-intelligent bandwidth limiting (like the suggestion of monitoring the transmit queue depth) is a karmic blocker.“
source: https://bugs.launchpad.net/ubuntuone-client/+bug/381348

The point about all this is: The nearly tiny feature request of adding a bandwith control to a small client got a blocker for Karmic as it might break user experience and could lead to a lot of bug reports about slow networking connections that are rather about UbuntuOne client consuming upload speed completely. I guess the decision to handle this as a blocker might be surprising on the one side but it is a wise decision as it focusses on the users point of view on the other and finally that’s what it’s all about: the user. Isn’t it?

my package of the day – mtr as a powerful and default alternative to traceroute

Know the situation? Something is wrong with the network or you are just curious and want to run a „traceroute“. At least under most Debian based systems your first session will probably look like this:

$ traceroute www.ubuntu.com
command not found: traceroute

Maybe on Ubuntu you will at least be hinted to install „traceroute“ or „traceroute-nanog“… To be honest, I really hate this lack of a basic tool and cannot even remember how often I typed „aptitude install traceroute“ afterwards (and press thumbs your network is up and running).

But sometimes you just need to dig a bit deeper and this time the surprise was really big as the incredible Mnemonikk told me about an alternative that is installed by default in Ubuntu and nearly no one knows about it: „mtr„, which is an abbreviation for „my traceroute“.

Let’s just check it by calling „mtr www.ubuntu.com“ (i slightly changed the output for security reasons):

                 My traceroute  [v0.72]
ccm        (0.0.0.0)          Wed Jun 20 6:51:20 2008
Keys:  Help   Display mode   Restart statistics   Order
of fields      Packets               Pings
 Host        Loss%   Snt   Last   Avg  Best  Wrst StDev
 1. 1.2.3.4   0.0%   331    0.3   0.3   0.3   0.5   0.0
 2. 2.3.4.5   0.0%   331   15.6  16.3  14.9  42.6   2.6
 3. 3.4.5.6   0.0%   330   15.0  15.5  14.4  58.5   2.7
 4. 4.5.6.7   0.0%   330   17.5  17.3  15.4  60.5   5.3
 5. 5.6.7.8   0.0%   330   15.7  24.3  15.6 212.3  30.2
 6. ae-32-52 58.8%   330   20.6  22.1  15.9  42.5   4.7
 7. ae-2.ebr 54.1%   330   20.6  25.0  19.0  45.4   4.7
 8. ae-1-100  0.0%   330   21.5  25.4  19.2  41.1   5.1
 9. ae-2.ebr  0.0%   330   27.5  34.0  26.7  73.5   5.2
10. ae-1-100  0.3%   330   28.8  33.6  26.7  72.5   6.0
11. ae-2.ebr  0.0%   330   30.8  32.9  26.7  48.5   5.0
12. ae-26-52  0.0%   330   27.6  34.8  26.9 226.8  26.8
13. 195.50.1  0.3%   330   27.7  28.4  27.2  42.5   1.7
14. gw0-0-gr  0.0%   330   27.9  28.1  27.0  40.5   1.4
15. avocado.  0.0%   330   27.8  28.0  27.2  36.2   1.0

You might notice, that the output is quite well formed („mtr“ uses curses for this). The interesting point is: Instead of running once, mtr continuously updates the output and statistics, providing you with a neat network overview. So you can use it as an enhanced ping showing all steps between you and the target.

For the sake of it: The package installed by default in Ubuntu is actually called „mtr-tiny“ as it lacks a graphical user interface. If you prefer a gui you can replace the package with „mtr“ by running „aptitude install mtr“. When running „mtr“ from the console afterwards you will be prompted with a gtk interface. In case you still want text mode, just append „–curses“ as a parameter.

Yes, that was a quick package, but if you keep it in mind, you will save time, you normalle spend for installing „traceroute“ and you’ll definitely have better results for network diagnose. Happy mtr’ing!

[update]

sherman noted, that the reason for traceroute not being installed is, that it’s just deprecated and „tracepath“ should be used instead. Thank you for the hint, though I’d prefer „mtr“ as it’s much more reliable and verbose.

my package of the day – aiccu (and sixxs.net) for IPv6 connectivity

It’s time: No reason should prevent you from adding IPv6 connectivity to your machine – desktop, notebook or server. Of course it is still an issue, as most internet service providers don’t provide native IPv6 yet. So in most cases the easiest way for you is setting up an ipv6 tunnel to a IPv6 broker. There are currently several IPv6 brokers around providing you with IPv6 access for free. Let me, in short, show a simple way of getting this with the package „aiccu“ and the IPv6 broker „Sixxs“.

Apply for an account

First you have to apply for an account on SixXS. Go to sixxs.net and sign up for a new account. Please note: As Sixxs is kind of an ISP, they really need valid customer information from you. If you provide them with a link to your Xing or LinkedIn profile they’ll give you even more credits.

Your application will be checked and (probably) given access. Wait for the mail. Afterwards log in with the credentials on the SixXS site and request a new tunnel and decide for an entry point close to you. Also this step needs to be approved. Wait for the mail, it will take upto a day. Now you should have a Sixxs account, an approved tunnel request and of course login credentials for Sixxs.

Set up aiccu

Now let’s get it running. Install the package aiccu via „aptitude install aiccu“. During installation you will be asked, which broker you are using. SixXS is already preconfigured. Nice, isn’t it? So choose SixXS and provide your credentials. If everything is fine, aiccu will check SixXS and ask for your tunnel data. If you did not get an error message, you are already done!

Open a terminal and run „ifconfig sixxs“ – it should show a new network interface with an IPv6 address. Now let’s check, if you have really access to IPv6. Open Firefox and go to www.kame.net. If the turtle logo is moving, your are using IPv6, if it does not, you don’t.

The SixXS credit system

Please note: When using SixXS you should understand it’s point system. For every action like requesting a tunnel or even a subnet, you will be taken points. For running a stable connection, you will be given points. This should motivate you to really use the service. Check it.

Security issues

Also note that all your IPv6 traffic will be directed through the broker. Of course you should check your security. As a tunnel with aiccu will „break“ a router (filtering on firewalls won’t grab the IPv6 data), you have to take care of the security by yourself on the machine which has IPv6 access.

IPv6 content

How to continue? Check www.sixxs.net/misc/coolstuff/ for interesting IPv6 only content. Yes, there are services on the web providing you with nice content via ipv6, for free. For instance access to high traffic news servers, access to a IPv6 freenode server and so on. Always keep in mind, that not every application yet is ready for IPv6 or needs to be configured to allow IPv6. With Debian/Ubuntu at least you should be able using Firefox, Thunderbird, the newsread Pan and Irssi as a start.

Happy networking!

[update]

Tiago mentioned in the comments, that he set up a wiki page explaining the IPv6 in detail. See https://wiki.ubuntu.com/IPv6. A really nice howto, which’ll probably work for most Debian based systems.

my package of the day: weather-util (weather report and forecast for the console)

Let me introduce you today into a tool that a lot of people might evaluate as useless: Jeremy Stanley’s weather-util. Whith this tiny python script, which finally found its way into Debian Etch and Ubuntu repositories, you can retrieve weather information from weather stations worldwide directly from the command line.

After installing it by running „aptitude install weather-util“ or synaptec, call „weather“:

$ weather
Current conditions at Raleigh-Durham International Airport (KRDU)
Last updated Jun 04, 2008 - 01:51 AM EDT / 2008.06.04 0551 UTC
   Wind: from the S (180 degrees) at 10 MPH (9 KT)
   Sky conditions: mostly cloudy
   Temperature: 72.0 F (22.2 C)
   Relative Humidity: 73%

Pretty impressive, isn’t it? Weather just makes an http call to a weather server for a preset station (where the heck is Raleigh-Durham International Airport?) and returns the current weather information. Of course you can also retrieve the forecast for the next days by running „weather -f“:

$ weather -f
Current conditions at Raleigh-Durham International Airport (KRDU)
Last updated Jun 04, 2008 - 01:51 AM EDT / 2008.06.04 0551 UTC
   Wind: from the S (180 degrees) at 10 MPH (9 KT)
   Sky conditions: mostly cloudy
   Temperature: 72.0 F (22.2 C)
   Relative Humidity: 73%
City Forecast for Raleigh Durham, NC
Issued Wednesday morning - Jun 4, 2008
   Wednesday... Partly cloudy, high 67, 20% chance of precipitation.
   Wednesday night... Low 96, 20% chance of precipitation.
   Thursday... Partly cloudy, high 71, 10% chance of precipitation.
   Thursday night... Low 97.
   Friday... High 72.

Sadfully the forecast only displays Fahrenheit, but that way we have enough space for patching the package :)

Retrieving local weather information

Now we are, of course, we are interested in the weather in our area. The easiest way is getting the ID for a weather station. Just go to http://weather.noaa.gov/ and choose your country/city/station by using the drop down menus for US and international stations. When you found a station close to your point of interest you can see a four letter id in round brackets. See the example above – the airport has KRDU. I am using EDDI most of the times which is Berlin Tempelhof – an airport in the city center of Berlin.

So you are ready to ask politely for weather again by giving the id with „weather –id=ID“, in my case „–id=EDDI“. (note: you can also make it short with „-iEDDI“:

$ weather --id=EDDI
Current conditions at Germany (EDDI) 52-28N 013-24E 49M (EDDI)
Last updated Jun 04, 2008 - 01:50 AM EDT / 2008.06.04 0550 UTC
   Wind: from the E (080 degrees) at 13 MPH (11 KT)
   Temperature: 62 F (17 C)
   Relative Humidity: 59%

Please note: Not all weather stations support forecasts (-f) and drop a 404 http error. You just have to try this. You can also switch on „verbose“ mode (-v) which gives you even more details.

Weather on the command line without weather-util?

Works like a charm, doesn’t it? For the curious people around who want to understand where weather-util pulls the information from: See

http://weather.noaa.gov/pub/data/observations/metar/stations/

for reference. Just text files on a web server regularly updated. Click around and go to there parent dir – you’ll find even more interesting information. So using weather-util without weather-util should be not a big deal.

Screen integration

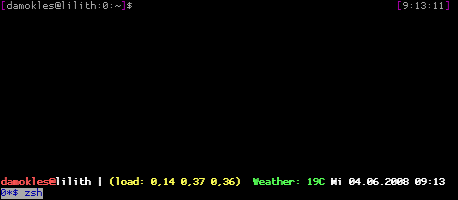
Now for the console lovers: You are using screen with a pimped status bar, don’t you? And in your wildest dreams you imagined the status bar showing the weather report, so you even don’t have to look outside the window because as a console guy you don’t even like your real „window“? No problem anymore by using screens backticks and weather-util.

As I noticed that weather-util runs into trouble from time to time when not being able to send it’s http request, I decided for a indirect weather pull by writing the information I need to a flat file by a cronjob. We just call weather-util and use awk to grab the snippet we need. I am interested in the temperature in Celsius. weather-util shows this line:

Temperature: 62 F (17 C)

So I use the following very quick and very dirty awk to get the „17“ out:

$ weather -iEDDI | awk '/Temperature/ {print $4}' | \
awk -F "(" '{print $2}'

Feel free to brush this up and report back. I am sure you can improve to use only one awk call instead of two.

You save this line to a shell script that is scheduled to run every five minutes and direct it via „>“ to write it’s output to a flat txt file. Within you .screenrc you read this file and display the contents in you status bar.
~/.screenrc:

startup_message off
defscrollback 1024
hardstatus on
hardstatus alwayslastline
backtick 1 0 300 cat /path/to/weather-text-file.txt

# remove line breaks made with "\"on the following lines
caption always "%{+b rk}$USER@%{wk}%H | %{yk}(Last: %l) %{gk} \
Weather: %1`C  %-21=%{wk}%D %d.%m.%Y %0c"
hardstatus alwayslastline "%?%-Lw%?%{wb}%n*%f %t%?(%u)\
%?%{kw}%?%+Lw%? %{wk}"

Make sure that have the file /path/to/weather-text-file.txt with the temperature in it. Now run screen and enjoy you shiny new status bar. See the green area in the screenshot below:
screen-weather.png

So that’s all for now. You should be able to play around with weather-util and screen to get the information you need (or let’s say „want“ :).

[update]

The incredible mnemonikk updated my awk | awk to a onetime sed within seconds:

$ weather -iEDDI | sed -n 's/.*Temperature:.*(\(.*\))/\1/p'

Thank you!

removing outdated ssh fingerprints from known_hosts with sed or … ssh-keygen

At least from the last issue in Debian-based systems including Ubuntu you might know the pain of getting the message from you ssh client that the server host key has changed as ssh stores the fingerprint of ssh daemons it connects to. Actually this is a neat feature because it helps you detecting man in the middle attacks, dns issues and other things you probably should notice.

Until recently I opened the file .ssh/known_hosts in vim, deleted the entry, saved the file and started over again. I randomly checked „man ssh“ which gives you a lot of hints about the usage of known_hosts but I just did not find information about how to delete an old fingerprint or even overwrite it. I imagined something like „ssh –update-fingerpring hostname“ with an interactive yes/no question you cannot skip. There is the setting „StrictHostKeyChecking“ that might get you out of the fingerprint-has-changed-trouble but it does not solve the real problem as you want those checks.

So after hanging around with Mnemonikk discussing this he pointed out a very simple method with „sed“ that is really handy and helps you understanding sed more deeply. You can advise „sed“ to run a command on a specific line. So have a look at this session:

1
2
3
4
5
6
7
8
9
10
11
12
13
14
$ ssh secrethost
@@@@@@@@@@@@@@@@@@@@@@@@@@@@@@@@@@@@@@@@@@@@@@@@@@@@@@@@@@@
@    WARNING: REMOTE HOST IDENTIFICATION HAS CHANGED!     @
@@@@@@@@@@@@@@@@@@@@@@@@@@@@@@@@@@@@@@@@@@@@@@@@@@@@@@@@@@@
IT IS POSSIBLE THAT SOMEONE IS DOING SOMETHING NASTY!
[...]
Offending key in /home/ccm/.ssh/known_hosts:46
[...]
Host key verification failed.
$ sed -i "46 d" .ssh/known_hosts
$ ssh secrethost
The authenticity of host 'secrethost (1.2.3.4)' can't be established.
RSA key fingerprint is ab:cd:ef:ab:cd:ef:ab:cd:ef:ab:cd:ef:ab:cd:ef:ab.
Are you sure you want to continue connecting (yes/no)?

We just took the line number 46 which ssh complains about and run in in-place-editing mode (-i) with the command run on line 46 the command delete (d). That was easy, wasn’t it? Small lesson learned about sed. Thank you Mnemonikk (he is currently working on a screencast about screen if you let me leak some information here :).

But to be honest I’s still looking for the „official“ method the delete a key from known_hosts. Therefore I browsed through the man pages and finally found what I was looking for in „man ssh-keygen“. Yes, definitely zero points for usability as deleting with a tool named „generator“ is confusing but it works, however. You can advice ssh-keygen to delete (-R) fingerprints for a hostname which helps you when you turned hashed hostnames on in you known_hosts:

1
2
3
4
5
6
7
8
9
10
11
12
13
14
15
$ ssh secrethost
@@@@@@@@@@@@@@@@@@@@@@@@@@@@@@@@@@@@@@@@@@@@@@@@@@@@@@@@@@@
@    WARNING: REMOTE HOST IDENTIFICATION HAS CHANGED!     @
@@@@@@@@@@@@@@@@@@@@@@@@@@@@@@@@@@@@@@@@@@@@@@@@@@@@@@@@@@@
[...]
Offending key in /home/ccm/.ssh/known_hosts:63
[...]
Host key verification failed.
[ccm@hasung:255:/etc/ssh]$ ssh-keygen -R secrethost
/home/ccm/.ssh/known_hosts updated.
Original contents retained as /home/ccm/.ssh/known_hosts.old
[ccm@hasung:0:/etc/ssh]$ ssh secrethost
The authenticity of host 'secrethost (1.2.3.4)' can't be established.
RSA key fingerprint is ab:cd:ef:ab:cd:ef:ab:cd:ef:ab:cd:ef:ab:cd:ef:ab.
Are you sure you want to continue connecting (yes/no)?

So „ssh-keygen -R hostname“ is a nice syntax as you even do not have to provide the file name and path for known_hosts and it works with hashed names. Nevertheless I’ll also use the sed syntax – keep it trained it’ll help you in other cases also.

Joining an Active Directory domain with Ubuntu

What a pain. Imagine you are in Windows network environment and have a small amount of Ubuntu desktops. You task is to let them join the Active Directory so users can login with their known credentials. There is a package in universe called „authtool“ even providing and promising to do what you need. Sadfully it is quite broken in it’s current status and if you ask me one should even consider removing it until it does at least not break you boot (don’t ask for details) and has a good set of working dependencies. There are other methods as ldap-binding but in my eyes there are either not stable or just too complicated to configure (and therefore hardly qualified for convincing people).

But a solution approaches if you read the following Ubuntu blueprint „Single User Interface to Join and Participate in Microsoft Active Directory Domains„. Currently you might not find much more information about it. So I dropped a line to the blueprint creator Gerald ‚Jerry‘ Carter who was so kind of updating me with the current status of the project (and happens to be directly involved in Likewise):

It is planned to package the open source version of Likewise called „Likewise Open“ for Ubuntu Hardy. Likewise Open enables you to join an Active Directory with actually some simple clicks or one console command. There is already an updated source tarball which can be installed quite easily:

1
2
3
4
5
$ wget \http://archives.likewisesoftware.com/\
likewise-open/src/likewise-open-4.0.4.tar.gz
$ tar zxf likewise-open-4.0.4.tar.gz
$ cd likewise-open-4.0.4-release
$ make dpkg

If you have all necessary dependencies resolved the make process should provide you with .deb files which you should install. As Jerry states there is currently one blocker which can be worked by not using the gui but calling a line like this

1
$ sudo domainjoin-cli join AD_REALM ADMIN_ACCOUNT

Afterwards you should be able to login like this „realm\username“. I tried the process on Gutsy and it worked quite well. I had to reboot once as my gdm hang – maybe it’s better to call the command directly from a „real“ console. So what is missing? Check the comparison of Likewise Open and Likewise Enterprise, the commercial version of Likewise. The thing you might miss at first is:

Do more during logon: Create a home directory, copy template files, set permissions, run scripts, deliver messages, and more.

This means that Likewise Open enables you to login as AD user, creates his home under /local/AD_REALM/USER but you have be smart and hack around a bit to get things working like managing sudo, running scripts and so on. But nonetheless Likewise Open seems to be a promising approach for solving the problem of Ubuntu-Windows-network integration and I am sure to see some nice addons from the community in the future.

Please note: Installing software that changes login procedures is a deep intervention into Linux core procedures. So please: Do this with a test environment before considering it for production purposes.

Bashup – a first example for a simple tree backup over ssh

Some days (weeks?) ago I told you about the release of „Bashup“ a bourne shell compatible backup script on sourceforge. As the script is still in heave Alpha I’d like to give you a first insight into it’s development.

Bashup is written in heavy Bash syntax and has few dependencies to external programs. You should image it as a scripting library for backups as it allows to call different backup methods and is more a framework than a fully integrated solution. The power of this is the ability to be free in the creation of a backup process while still using easy methods.

The following is a fairly easy setup of bashup for backing up some directories over ssh. You see that we only source the bashup library here, setup some variables and call the bashup method then which executes the backup.

1
2
3
4
5
6
7
8
9
10
11
12
13
14
15
16
17
18
19
20
21
22
23
24
25
26
27
28
#!/bin/bash
# source bashup lob
. bashup_lib.sh
 
# set setup source - we want to backup a tree
SOURCE=tree
# set source dirs
TREE_DIRECTORIES="$HOME/PDF $HOME/ogg"
# setup filter for compression
FILTER=bzip2
 
# set destination - we want to ssh
DESTINATION=ssh_file
# set ssh host, you could be clever
# and setup access in .ssh/config
SSH_HOST=host.name.tld
# set remote file name
FILE=file.name.bz2
 
# we want two types of logging
USE_REPORTERS="console log"
 
# set the log file names
COMBINED_LOG=combined.log
ERROR_LOG=error.log
 
# call bashup
bashup

I admit this example won’t win a Noble award but if you are busy with setting up backups on very different servers you might like the idea of a scripting environment which only needs bash. Imagine your power when digging deeper into the bashup lib and calling the special methods directly while piping output and more. This is possible of course.

In the next weeks I’ll show you how to use backup rotation (yes, also over ssh, ftp and other methods), mysql/postresql/oracle/subversion backup, nagios feedback integration and more.

If you like to test and tell me what you think or even want to provide patches, feel free to checkout bashup:

svn co https://bashup.svn.sourceforge.net/svnroot/bashup bashup

Bashup – a sophisticated Bash backup script

Mnemonikk (who still lacks a blog because he cannot decide which name to choose) finally made the step to create a sourceforge project for Bashup. Bashup is a more or less modular and Bourne shell compatible backup script with few dependencies. It targets backup for servers and provides features like mysql, oracle, postgresql, subversion repository and file system backup, backup over ftp, ssh, rsync, heavy rotation (yes – even over ftp) and reporting. The script is already used on a couple of different live servers. It matches the need for a script that is neither binary, nor python, ruby or perl but just plain shell and some external calls.

The script is released under GPL. Right now you can only get it by checking out the svn repository (see sourceforge project page for details) but will be branched with an official version number soon. I know there are a lot of backup solutions out there and this is just one more, but you might also know how difficult it can be to backup a system when having very limited possibilities to install software and servers distributed on very different data centers…

Feel free to contact me for gaining access as developer. Patches and new modules welcome!

Ubuntu LAN party

While dealing with preparations for our already announced Hardy Heron release party we are currently planning an Ubuntu LAN party. What does that mean? The Ubuntu Berlin team came to the conclusion that network gaming is one of the major reasons for sticking to Windows based operating systems. There is of course an unmanageable amount of games of Windows machines out there – no doubt about it. But it seems to be a prejudice that you cannot have network based gaming fun on Linux. And I don’t mean running Wine, VmWare or similar here.

Therefore we set up a small and incomplete list with games that you can play under Linux. Some of them are actually Windows games that can run under Wine – but only some (and they are a kind of compromise for some of our members). Quite enthusiastic discussions occurred in conjunction with games like „Battle for Wesnoth„, „Armagetron„, „OpenArena“ and „Nexuiz„. All of them are available through Ubuntu package repositories and – even better – not all of them are shooters.

So we are happily looking towards our first lan party within the next weeks which will be located at c-base or newthinking store if one them lets us in. I hope that we also have time to do some bug reporting afterwards if necessary – it should be a great possibility to do some network game stress tests.

Powered by ScribeFire.

The dilemma of ssh authorized_keys key files and its comments

Imagine the following situation: You care for live servers and work in a team of let’s say five, six or even more people. Access to the servers is granted through ssh. The people login either as root (yes, you should not do that, but that is not the point here) or as user with sudo rights or they just share an unprivileged account. Authentication is done via ssh keys.

Now somebody leaves your team. Either as he has a new job or he just got fired. Of course you start deleting his key from all those ~./ssh/authorized_keys files. You have been smart before as you forced your buddies to use their real name or mail address as comment in the key. Easy identification.

But then you start thinking: How do I know I am deleting the right keys? Let’s say the target user is a smart bad guy. He just might have done the following: He looks for somebody who seldomly logs in. Maybe a manager has a key just for security purposes or something like that. Now he exchanges the order of the keys and its comments if they are in a shared authorized_keys or he even exchanges the authorized_keys files when they belong to different users, so you just think you are deleting the right keys but disable another person – in the worst case even yourself.

Of course you can start working around this with trip wire, shell scripts and so on, but be honest: Being able to change the comment in an ssh key without disturbing a checksum or even a signature that rings bells and whistles is a pain for every security minded administrator.

Feel free to hint me an easy solution for this that you might already have implemented.